Frequently Asked Questions (FAQ)
EndNote
Can the owner for the shared library be changed?
Yes, there are several ways to change the owner of the library. An owner (is an email address and password to access EndNote Web https://web.endnote.com or the older EndNote Online https://www.myendnoteweb.com) can synchronize (Sync) the library to the EndNote Web or Online environment and/or share the library with 1.000 other EndNote Web/Online accounts.
As the ‘owner’ of a library do the following:
- Click menu ‘File > Open Library’
- Browse to the right folder where your library is situated
- Select the .enl file of the library you own (e.g. My EndNote Library.enl) and click ‘Open’.
- Now we are going to save a copy of your library and remove the ‘ownership’ and the shared user (email addresses) list.
Click ‘File > Save a Copy’.
When doing so from the shared EndNote library, the resulting copy (with EndNote 21 or 2025) no longer retains its Share property.
Transfer the .enl file and .Data folder to another user. You may also open this ‘copy’ library and create an archive file (.enlx) which contains both the .enl file as the .Data folder and send or transfer the resulting .enlx file to your colleague who whill take over the ownership of the library. This should allow another EndNote Web/Online user (email address) to obtain the ownership, Synchronize this library to the EndNote Web/Online environment and become its new owner/host. From here the new owner can synschronize the library (Preferences > Sync > Enable Sync > Sign up) and start sharing the library (File > Share > Enter one or more email addresses).Another way is to change the user name (email address) of the EndNote Web/Online user (replace after login to EndNote Web/Online your existing user name (email address) by another user name (email address).
- First, log in to your account from here: https://apps.clarivate.com/account?app=endnote&tab=email
- You will be routed to the Account sign-in & security page.
- Here, add a valid secondary email where a verification email will be sent.
- Now the second email address should be able to take over the ownership.
Last and not the least, use a generic email address (e.g. endnote1@org.gov or endnote2@org.com) and forward this account to the regular email address of the ‘current’ or ‘actual’ owner of the library. If someone leaves the organization forward the email to another users email address. The other person can use/continue using the same user name (e.g. email address endnote1@org.gov or endnote2@org.com).
Please mind:
Any library, with an owner, e.g. some EndNote Online user name (email address), can be synced by that user to EndNote Web/Online and therefore can be shared with 1.000 other EndNote Web/Online users.
The owner opens the library via ‘File > Open Library). All shares open the library via ‘File Open Shared Library > Click user name/email address of person who shares the library > Open the shared library).Sharing EndNote libraries
There are many ways to share an EndNote Library or ‘groups’. The
below procedure describes different ways to share an EndNote library.
Please also see
EndNote – Sharing libraries, or the detailed description of ‘Classic’ network sharing (FAQ item 10).Each EndNote library consists of two items:
- An .enl file (e.g., MyLibrary.enl)
- An .Data folder (e.g., MyLibrary.Data)
The .Data folder consists of the (PDF) attachments and the database files and subfolders.
A compressed library consists of one .enlx file (e.g.,
MyLibrary.enlx, compare with .docx, .xlsx, .pptx). The .enlx file is in
fact a zip-file. You can create a compressed library via EndNote menu
‘File-Compressed Library’. It is optional whether you would like to
include file attachments or not. The .enlx file is primarily for
transfer and backup purposes (email, usb stick, backup).Together with your EndNote Desktop license you are entitled to create
an EndNote Online account. This account consists of your email address
and a password. With this EndNote Online account you will be able to
‘Sync’ one of your libraries (your ‘master’ library) to the EndNote
Online environment and to your EndNote for iPad.Best practice to setup your EndNote Online account
This way your EndNote Desktop license will be correctly ‘connected’ with your EndNote Online account.
- Decide which of your possible multiple libraries will be your
‘master library’ which you would like to Sync to your EndNote Online or
to your EndNote for iPad. - Open the ‘master library’ in EndNote 2025 desktop.
- Create a ‘compressed library backup via ‘File > Compressed
library’. This feature will create a ‘zip’ file of your EndNote library
(extension will be .enlx). Put this .enlx file in a backup folder. This
is for safety reasons. If needed you will be able to restore your
library from this .enlx file, just by opening this file with your
EndNote desktop. - To create your EndNote Online account;
- For Windows;
Go to ‘Edit – Preferences – Sync’.
- For Mac;
Go to ‘EndNote 2025 menu – Preferences – Sync’.
- Click ‘Enable Sync’.
- Click ‘Sign up’ and enter your email address and click ‘Submit’.
- Enter additional information and enter a password.
- Do not check ‘Automatically Sync’ yet untill you are familiar with the Sync feature.
Perform your first sync manually via ‘Library > Sync’. Go to https://www.myendnoteweb.com or https://web.endnote.com and login with your EndNote Online account credentials to see the Online (synced) version of your library.
Download and install your EndNote for iPad version from the Apple App
store and enter your EndNote Online credentals to Sync your library to
your iPad.If you have ever synced another library in the past, the system will
warn you that the library you are trying to Sync is different than the
one used before. Please do not proceed before making a decent backup of
your current ‘master’ library.There are four different options to share your library.
A. Share your ‘master’ ‘Sync’ assigned library accross your own devices (EndNote desktop, Online, iPad).
Please see above.
B. Share your ‘master’ and ‘Sync’ assigned library with 1000 other colleagues.
- Your colleagues should create an EndNote Online account first. See above ‘EndNote Desktop, Online and iPad®’ or via https://www.myendnoteweb.com or https://web.endnote.com.
- After you have setup your own EndNote Online account and you have
assigned your ‘master’ library for syncing and you have synced once
(f.i. via ‘Library > Sync’), you may share this specific library via
‘File > Share’. - Enter the email address (EndNote Online account) of your colleague and click ‘Invite’.
- Your colleague will receive an email and will need to confirm and login once with his/her EndNote Online account.
- After confirming and loging in, your colleague opens the ‘shared’
library via ‘File > Open Shared Library’. Your colleagues will have
‘read-write’ access to the library you shared with them. - You may unshare anyone from sharing via the ‘File > Share’ screen.
- On their turn, your colleagues will be able to setup their own
‘master’ sync library and share their own library with other colleagues.
A detailed description can be found here on our web site.
C. Share a reference ‘group’ with other EndNote Online accounts.
- Go to https://www.myendnoteweb.com or https://web.endnote.com.
- Login.
- Go to ‘Organize > Manage my groups’.
- Check ‘Share’ right behind the ‘Group’ you would like to share.
- Click ‘Manage sharing’ and ‘Start sharing this group’.
- Enter your colleague’s EndNote Online account email address.
- Choose ‘Read only’ or ‘Read & Write’.
- Click ‘Apply’.
- Your colleagues will get notified and need to confirm by loging in.
Please mind: Attachments of references will not be shared if you use ‘Group sharing via EndNote Online’.
Important: Once your colleagues get groups shared they will need to
login to the EndNote Online environment and check the following
settings:‘Organize > Other’s Groups’:
- Show
- Use for Cite While You Write
D. Classic ‘file’ sharing via the network via a shared folder.
Please see the detailed instructions on our web site FAQ pages.
“
How to add EndNote 2025 and 21 Cite While You Write (CWYW) add-on in Google Docs via Marketplace
How to add EndNote 2025 and 21 Cite While You Write (CWYW) add-on in Google Docs via Marketplace:
Open Google Docs
- Navigate to
- Extensions
- Add-ons
- Get add-ons
- Search for: ‘EndNote’ of ‘cite while you write’ (Extension is named ‘EndNote Cite While You Write™’)
- Click on the EndNote tile to open
- Click Install
- Review Terms & Conditions and privacy policy and click Continue to proceed.
- Sign into your Google account and allow ‘EndNote Cite While You Write™’ access to your Google account.
- Create a new document and open EndNote Cite While You Write Extension. ‘Open’ link may take a moment to appear, this is a function of Google.
Note: Security alert emails will be sent to the email account associated with the Google account; these are standard to notify access was granted to EndNote’s CWYW. Users may review activity and take action, if needed.
Important: For customers to log into CWYW in Google Docs, they must have an EndNote 2025 and 21 enabled EndNote Web account. To activate their web account in EndNote 2025 and 21, the user should go to ‘EndNote 2025 and 21/Edit > Preferences > Sync > Enable Sync’.
EndNote can’t save a new/edited Style, Filter or Connection
This problem occures when EndNote wants to save the new/edited file to the standard folder.
A new location should be assigned manually.- Start EndNote and click at the top on ‘Edit’ and then ‘Preferences…’.
- At the left side, click on ‘Folder Locations’.
The Styles, Filters and Connections folder can be find in the Documents/EndNote folder of the user.
If these folders don’t exist, then you should create them manually.
The new folders should look like the following:- Documents/EndNote/Styles
- Documents/EndNote/Filters
- Documents/EndNote/Connections
After creating these folders or if they already existed, continue with the following steps:
- Click on ‘Select Folder’.
- Browse to the created/existing folder and assign it to the correct folder type (Styles, Filters or Connections).
- Click on ‘Apply’ and then ‘OK’.
EndNote should now be able to save the new/edited Style, Filter or Connection.
Can we add an Output Style to EndNote Online or myendnoteweb
Any user can add a new style to EndNote on the desktop by placing the new style in one of the EndNote styles folders (setup folderstyles or private folder, see Edit-Preferences-Folder Locations-Styles), but only an EndNote administrator for a site license can upload a new style to EndNote basic/online using the administrator tools.
When EndNote is installed, by default only the most ‘popular’ output styles are installed. How can I download all output styles?
When EndNote is installed, by default only the most ‘popular’ output styles are installed.
Journal Styles can be available on two places:
- Generic for all users the default (non editable location) is the installation folder and sub folder ‘Styles’ (e.g. for Windows: ‘C:Program Files (x86)EndNoteStyles’ and for Mac: ‘Applications/EndNote/Styles’).
- Customized (‘Save as’), user specific files will be stored in the folder which is defined in the folder on Windows: ‘Edit > Preferences > Folder Locations > Styles’ and on Mac: ‘EndNote> Preferences > Folder Locations > Styles’.
To download other output styles, you can choose one of the following instructions:
- You can download all output styles if you select ‘Custom’ option during EndNote installation.
- If you completed EndNote installation, ‘Typical’ option is selected and you want to download all output styles:
Windows:
- Windows 8.x: Go to ‘Control Panel>Programs and Features’. Select EndNote and choose ‘Change’. Select the ‘Modify Option’ and click ‘Next’.
Windows 10: Go to ‘Settings > Apps & Features’ and select EndNote. Click ‘Modify’ and click ‘Next’.
- Place a check next to ‘Additional Styles’ and choose ‘Will be installed on local hard drive’. Click the plus sign to select only specific connections. Click ‘Next’.
Mac OS:
- In EndNote, go to ‘Menu’ and choose ‘Customizer’.
- Place a check next to all of the ‘Output Styles’ you’d like.
- Click “Next” twice and ‘Done’ to close the window.
- If you completed EndNote installation, ‘Typical’ option is selected and you want to download one of output styles:
- Run ‘EndNote’
- From the Edit menu, choose ‘Output Styles/Open Style Manager…’
- Click ‘Get More on the Web…’ buton from ‘EndNote Styles’ window.
- For download one of output styles, you can use download links from the list below on this page.
And then you can use these files after copy to
- Windows: ‘C:Program FilesEndNoteStyles’ folder
- Mac: ‘ApplicationsEndNoteStyles’ folder
or
- Double-click the style file. It should open in EndNote.
- In EndNote, click “File Menu” and choose ‘Save as’. Remove the word ‘copy’ and click ‘Save’.
- Click on ‘File Menu’ and choose ‘Close Style’.
- If you completed EndNote installation, ‘Typical’ option is selected and you want to download one of output styles:
- Go tohttp://endnote.com/downloads/stylesweb page.
- For download one of output styles, you can use download links from the list below on this page.
And then you can use these files after copy to
- Windows: ‘C:Program FilesEndNoteStyles’ folder
- Mac: ‘ApplicationsEndNoteStyles’ folder.
or
- Double-click the style file. It should open in EndNote.
- In EndNote, click “File Menu” and choose ‘Save as’. Remove the word ‘copy’ and click ‘Save’.
- Click on “File Menu” and choose ‘Close Style’.
EndNote and Big Sur and Apple M1 chip compatibility
The below will also work for systems running Apple Big Sur.
Please note we are still testing compatibility with the Apple M1 chips. We will note any known issues and workarounds on this article as we continue our testing and work on permanent solutions.
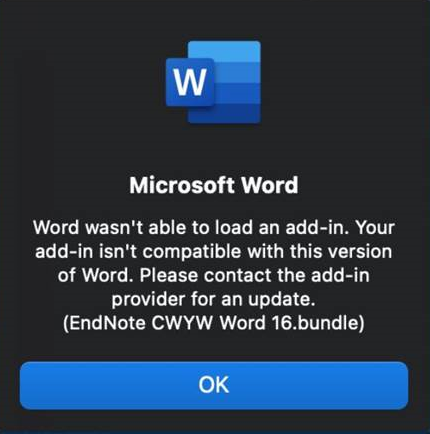
Some customers with M1 machines have reported an error message stating that MS Word can’t load an add-in. The workaround for this is to set MS Word to open with Rosetta.
- Quit EndNote and MS Word.
- Open Finder and go to the Applications folder.
- Highlight the Microsoft Word app file by clicking on it once. Note: You do not need to launch MS Word, just highlight it.
- Go to the File menu at the top of your screen and choose Get Info.
- Under General, check the option for Open using Rosetta.
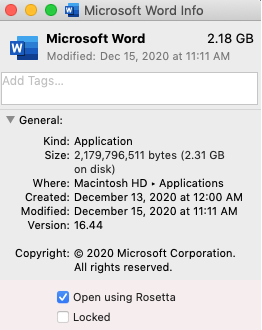
- Open Microsoft Word to confirm the error message does not occur.
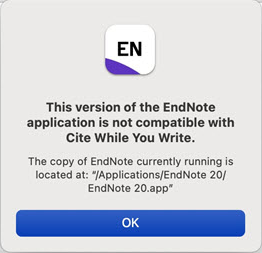
If the following error still occurs with normal visible and available EndNote 20 CWYW and ‘Open Using Rosetta’ check box is checked (in case of a M1 chip): This version of the EndNote application is not compatible with Cite While You Write. The copy of EndNote currently running is located at: “/Applications/EndNote 20/EndNote 20.app
Please follow the Mac, Check 2 troubleshooting items:
Please contact us if you have difficulties with these steps, or run into any other issues running EndNote on M1 machines.
Sharing customized reference types between users
Please note: importing another reference type will replace your own reference type table and overwrite all changes.
To export the RefTypeTable.xml file:
- In EndNote, go to ‘Edit’
- Click on ‘Preferences’
- Select ‘Reference Types’
- Click on ‘Export’ and save the file
- Click on ‘Apply’ and/or ‘OK’
To import the RefTypeTable.xml file:
- In EndNote, go to ‘Edit’
- Click on ‘Preferences’
- Select ‘Reference Types’
- Click on ‘Import’ and browse to the RefTypeTable.xml file to open it
- Click on ‘Apply’ and/or ‘OK’
Advanced method:
Copy the RefTypeTable.xml file from the following location:
Windows XP or 2000:
- C:Documents and Settings%Username%Application DataEndNote
- Windows Vista or Windows 7 and Windows 8:
- C:Users%Username%AppDataRoamingEndNote
- Username in this case would be your computer login name.
- Place RefTypeTable.xml in the same folder on the other user’s account.
Macintosh OS X:
- Copy the RefTypeTable.xml file from the following location:
- Users:[your login name with the house icon]:Library:Application Support:EndNote
- Place RefTypeTable.xml in the same folder on the other user’s account.
How to move, change, reset or copy field content in EndNote
If you are looking for changing misspelled items in EndNote references there are several ways to change items. To change misspelled words you may find the menu item ‘Library (older versions Edit) > Find and Replace‘ very useful. This feature works similar to MS Words or any other applications ‘Find and Replace’ feature. Here you can select the target field where you would like to change misspelled words or carriage returns and insert anything in ‘Find’ and in ‘Replace with’ fields. By clicking ‘Change’ EndNote will look for the ‘Find’ item and replace it with the entered data in ‘Replace with’.
For correcting Journal names (Synonyms abbreviated, long, custom), Keywords and Author names, you will need to go to the ‘Term Lists’ via ‘Library (older versions Tools) > Open/Define/Link Term Lists‘.
However, how would you move or clear the whole content of a certain field, e.g. Abstract. Or assuming you have entered some confidential data in some field and you would like to share the EndNote library with other third parties and would like to clear the or replace the content of a field… Then you will need ‘Library (older versions Tools) > Change/Move/Copy Fields…‘
Since this feature can be dangerous, please always backup your library file (.enl) and your folder (.Data) or make a compressed (.enlx) packed/zipped) copy of the library by choosing ‘File-Compressed library (.enlx)…’
Go to ‘Library (older versions Tools) > Change/Move/Copy Fields…‘ Now you will see two tabs: ‘Change Fields‘ and ‘Move/Copy Fields‘.
‘Library (older versions Tools) > Change/Move/Copy Fields… – Change Fields’
‘Library (older versions Tools) > Change/Move/Copy Fields… – Change Fields’The listed options speak for them self. To clear the entire field for instance, you may choose ‘Clear field’ from the ‘Change Fields’ tab and select the correct field right after ‘In’.
Please be safe and make backups!
Can I transfer the references from the Word document whose EndNote library has been deleted to EndNote?
To export references from a Word document to an EndNote library:
- Open the document in Word.
- From the Tools menu, go to the EndNote submenu, and then select Export Traveling Library. From the EndNote tab, select Export to EndNote, and then select Export Traveling Library.
- On the Export Traveling Library dialog, select either:
-
- An existing EndNote library:
Select a library from the drop-down list of available libraries, or click Browse to locate a library. - A new EndNote library:
You will be prompted to name and save the new library.
- An existing EndNote library:
Note: We recommend that you export to a new EndNote library, so you can review the records before adding them to an existing library.
There is an alternate way to copy references from your Word document to an EndNote library. Open both your Word document and the EndNote library. Then, in EndNote, go to the Tools menu, then the Cite While You Write submenu, and select Import Traveling Library
When you use the Export/Import Traveling Library commands, the exported references are renumbered and do not retain their original reference numbers.
The Traveling Library does not contain Notes, Abstracts, Figures, or Captions.
When EndNote is installed, by default only the most ‘popular’ import filters are installed. How can I download all import filters?
When EndNote is installed, by default only the most ‘popular’ import filters are installed.
Import Filters can be available on two places:
- Generic for all users the default (non editable location) is the installation folder and sub folder ‘Filters’ (e.g. for Windows: ‘C:Program Files (x86)EndNoteFilters’ and for Mac: ‘Applications/EndNote/Filters’).
- Customized (‘Save as’), user specific files will be stored in the folder which is defined in the folder on Windows: ‘Edit > Preferences > Folder Locations > Filters’ and on Mac: ‘EndNote> Preferences > Folder Locations > Filters’.
To download other import filters, you can choose one of the following instructions:
- You can download all import filters if you select ‘Custom’ option during EndNote installation.
- If you completed EndNote installation, ‘Typical’ option is selected and you want to download all import filters:
Windows:
- Windows 8.x: Go to ‘Control Panel>Programs and Features’. Select EndNote and choose ‘Change’. Select the ‘Modify Option’ and click ‘Next’.
Windows 10: Go to ‘Settings > Apps & Features’ and select EndNote. Click ‘Modify’ and click ‘Next’.
- Place a check next to ‘Additional Filters’ and choose ‘Will be installed on local hard drive’. Click the plus sign to select only specific filters. Click ‘Next’.
Mac OS:
- In EndNote, go to ‘Menu’ and choose ‘Customizer’.
- Place a check next to all of the ‘Import Filters’ you’d like.
Click “Next” twice and ‘Done’ to close the window.
- If you completed EndNote installation, ‘Typical’ option is selected and you want to download one of import filters:
- Run ‘EndNote’
- From the Edit menu, choose ‘Import Filters/Open Filters Manager…’
- Click ‘Get More on the Web…’ buton from ‘EndNote Import Filters’ window.
- For download one of import filters, you can use download links from the list below on this page.
And then you can use these files after copy to
- Windows: ‘C:Program FilesEndNoteFilters’ folder
- Mac: ‘ApplicationsEndNoteFilters’ folder.
or
- Double-click the filter file to open in EndNote.
- In EndNote, click ‘File Menu’ and choose ‘Save as’. Remove the word ‘copy’ and click ‘Save’.
- Click on ‘File Menu’ and choose ‘Close Filter’.
- If you completed EndNote installation, ‘Typical’ option is selected and you want to download one of import filters:
- Go to http://endnote.com/downloads/import-filters web page.
- For download one of import filters, you can use download links from the list below on this page.
And then you can use these files after copy to
- Windows: ‘C:Program FilesEndNoteFilters’ folder
- Mac: ‘ApplicationsEndNoteFilters’ folder.
or
- Double-click the filter file to open in EndNote.
- In EndNote, click ‘File Menu’ and choose ‘Save as’. Remove the word ‘copy’ and click ‘Save’.
- Click on “File Menu” and choose ‘Close Filter’.
EndNote: What happens when trial expires?
The EndNote desktop trial will work as a fully functional program during the trial period. You will have 30 days after you first use the program to evaluate EndNote and all of its features. After those 30 days are up, the program will revert to a feature-restricted EndNote Viewer.
After the program reverts to an EndNote Viewer, you will still be able to open EndNote libraries, search, sort, and print references. However, with
the EndNote Viewer you cannot:
- Add or edit references in a library that has 10 or more references already in it.
- Format more than 10 citations in a paper.
- Retrieve more than 10 references from a remote database.
- Import more than 10 references.
- Export more than 10 references at one time.
- Sync with EndNote online.
How can I complete the journal names in Term List?
Instructions to complete the Journal names:
- Start EndNote
- Go to ‘Library’ – ‘Open Term Lists’ – ‘Journals term List’ (EndNote 20 or later)
Go to ‘Tools’ – ‘Open Term Lists’ – ‘Journals term List’ (EndNote X9 or earlier) - In the tab Lists, select ‘Journals’.
- Click on tab ‘Terms’.
- If you wish to do so, you can delete the current list of Journal names.
- Go back to the tab ‘Lists’.
- If not already selected, select ‘Journals’.
- Click on the button ‘Import list’.
- Go to the installation folder of EndNote
- Open the sub folder ‘Terms lists’
On, for instance, Windows 8, 10, 11 64-bit system this is standard:
C:Program Files (x86)EndNote 2025Terms ListsOn, for instance, Windows 8, 10, 11 32-bit system this is standard:
C:Program FilesEndNote 2025Terms Lists - Select the list that you would like to import (f.i. Medical.txt). There is a list available per discipline.
- Click on the button ‘Open’.
All Journals including the correct abbreviations will now be imported.
Verification:
- Start EndNote
- Go to ‘Library’ – ‘Open Term Lists’ – ‘Journals term List’ (EndNote 20 or later)
Go to ‘Tools’ – ‘Open Term Lists’ – ‘Journals term List’ (EndNote X9 or earlier) - In the tab Lists, select ‘Journals’.
- Click on the tab ‘Terms’.
Google Chrome, how to directly export references from an online source to EndNote
How to directly export references (.ciw, .enw, .ris files) from an online source in Google Chrome to EndNote automatically:
- Start Google Chrome.
- Download at least one exported file (e.g., some references export from Google Scholar, e.g. scholar.enw).
- Right mouse click on the file in the download bar and select “Always open files from this type”.
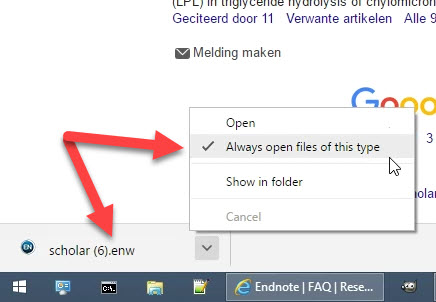
- Now the settings are finalized in Google Chrome and the file will open automatically each time it is downloaded.
In some cases Windows can’t open certain file types, since the extension isn’t defined to an application.
To configure this, go via Windows Explorer to the folder you downloaded the reference export file. - RIGHT mouse click one of the downloaded/exported files (e.g. scholar.enw).
- Choose ‘Open With’ and “Choose default program…’
- Choose ‘Keep using EndNote 21’ or if there is no application defined yet, choose ‘More options’ and “Look for another app on this pc’.
- Browse to the EndNote installation folder and select your EndNote 21 executable (.e.g, C:Program Files (x86)EndNote 2025EndNote.exe’).
- Click ‘Open’.
Now any file with the extension .enw (e.g., scholar.enw) will be automatically opened in EndNote and the references imported.
Repeat steps 5 through 9 for other files with extensions (e.g. .ris, .ciw).How can I update EndNote to the latest patches?
Windows:
There are 2 different options to get the newest update:
- Start EndNote. A splash screen is shown where you can download and install the update.
- Start EndNote. Click on the tab above on ‘Help’ > ‘Check for Updates’.
macOS:
There are 2 different options to get the newest update:
- Start EndNote. A splash screen is shown where you can download and install the update.
- Start EndNote. Click on the tab above on ‘EndNote’ > ‘Check for Updates’.
How can I (manually) backup my library?
Each EndNote library consists of two items:
- An .enl file (e.g., MyLibrary.enl)
- An .Data folder (e.g., MyLibrary.Data)
The .Data folder consists of the (PDF) attachments and the database files and subfolders.
A compressed library consists of one .enlx file (e.g., MyLibrary.enlx, compare with .docx, .xlsx, .pptx). The .enlx file is in fact a zip-file.
There are different ways to backup your library.
Backup via the EndNote application:
- Create an ‘EndNote backup’ folder.
- Start EndNote and open your library.
- Choose ‘File > Compressed Library (.enlx)…’. ‘Compressed Library (.enlx)’ screen will be displayed.
- Depending on the criteria you select with the ‘Create’ option, you can compress the entire library, a group set, a group or references that you have selected in your library with or without file attachments, and email your compressed library with the ‘Create & Email’ option. Best is to backup the whole library including attachments (default).
- Click ‘Next’ button to backup the compressed your library.
- Save the .enlx file (compressed/zipped EndNote library file, e.g. Mylibrary.enlx) to the ‘EndNote backup’ folder (step 1).
Restoring a Compressed Library File
- Start EndNote and choose ‘File > Open library’ and browse to the .enlx file and click ‘Open’.
- When the .enlx file is opened, EndNote will extract the .enl file and the .Data folder to the same folder where the. enlx file has been opened. Therefore, you might wnat to copy the .enlx file to a folder where you want the library file and folder to be extracted, before opening the .enlx file.
Manually backup your library:
- Create an ‘EndNote backup’ folder.
- Browse via Windows Explorer or with Mac Finder to the folder where your library resides.
- Copy the .enl file and .Data folder (e.g. ‘Mylibrary.enl’ file and ‘Mylibrary.Data’ folder) to the ‘EndNote backup’ folder.
How can I import/export or link a term list?
To import or export a term list:
- In EndNote, go to ‘Tools’
- Click on ‘Define Term Lists’
- Select the library and list you wish to import to or export from, e.g., Authors, Journals, Keywords or a custom list
- To import: click on ‘Import List’ and select the file you wish to import
- To export: click on ‘Export List’ and select the file you wish to export
- Click on ‘Close’
The advantage of linking a term list to a certain field in a reference (type): While entering new data, the existing terms will appear while you type, allowing you to select a term, resulting in faster and error free input.
To link fields with term lists:
- In EndNote, go to ‘Tools’
- Click on ‘Link Term Lists’
- Select the library you wish to edit
- You can now select/link your term lists with the fields
- Click on ‘OK’ after you finished linking
When EndNote is installed, by default only the most ‘popular’ connection files are installed. How can I download all connection files?
When EndNote is installed, by default only the most ‘popular’ connection files are installed.
Connection Files can be available on two places:
- Generic for all users the default (non editable location) is the installation folder and sub folder ‘Connections’ (e.g. for Windows: ‘C:Program Files (x86)/EndNote/Connections’ and for Mac: ‘Applications/EndNote/Connections’).
- Customized (‘Save as’), user specific files will be stored in the folder which is defined in the folder on Windows: ‘Edit / Preferences / Folder Locations / Connections’ and on Mac: ‘EndNote/ Preferences / Folder Locations / Connections’.
To download other connection files, you can choose one of the following instructions:
- You can download all connection files if you select ‘Custom’ option during EndNote installation.
- If you completed EndNote installation, ‘Typical’ option is selected and you want to download all connection files:
Windows:
- Windows 8.x: Go to ‘Control Panel/Programs and Features’. Select EndNote and choose ‘Change’. Select the ‘Modify Option’ and click ‘Next’.
Windows 10: Go to ‘Settings / Apps & Features’ and select EndNote. Click ‘Modify’ and click ‘Next’.
- Place a check next to ‘Additional Connections’ and choose ‘Will be installed on local hard drive’. Click the plus sign to select only specific connections. Click ‘Next’.
Mac OS:
- In EndNote, go to ‘Menu’ and choose ‘Customizer’.
- Place a check next to all of the ‘Connections’ you’d like.
Click ‘Next’ twice and ‘Done’ to close the window.
- If you completed EndNote installation, ‘Typical’ option is selected and you want to download one of connection files:
- Run ‘EndNote’
- From the Edit menu, choose ‘Connection Files/Open Connection Manager…’
- Click ‘Get More on the Web…’ buton from ‘EndNote Connection Files’ window
- For download one of connection files, you can use download links from the list below on this page.
And then you can use these files after copy to
- Windows: ‘C:Program Files/EndNote/Connections’ folder
- Mac:’Applications/EndNote/Connections’ folder.
or
- Double-click the connections file to open in EndNote.
- In EndNote, click ‘File Menu’ and choose ‘Save as’. Remove the word ‘copy’ and click ‘Save’.
- Click on ‘File Menu’ and choose ‘Close Connection’.
-
If you completed EndNote installation, ‘Typical’ option is selected and you want to download one of connection files:
- Go to http://endnote.com/downloads/connections web page.
- For download one of connection files, you can use download links from the list below on this page.
And then you can use these files after copy to
- Windows: ‘C:Program Files/EndNote/Connections’ folder
- Mac:’Applications/EndNote/Connections’ folder.
or
- Double-click the connections file to open in EndNote.
- In EndNote, click ‘File Menu’ and choose ‘Save as’. Remove the word ‘copy’ and click ‘Save’.
Click on ‘File Menu’ and choose ‘Close Connection’.
I have ordered an EndNote upgrade edition in your web store. The setup asks for a serial number and a product key. What should I enter into the two fields asking for a serial number and a product key?
A serial number looks like 5234567890 or 2234567890, starts with a 5 or 2 and is entirely numeric. A product key looks like 9NGHJ-Z7TRQ-UTR12-F9TQP-KL7MN and is 25-character alpha-numeric.
New full product installation require a product key. However, for the setup of Upgrade editions a serial number of an older (previous) edition and a (new) product key will be necessary.
Administrative
I ordered software in your web shop, how can I download it?
As soon as your order has been processed, you’ll receive an e-mail with Order Details (please check the folder with Junk E-mail if you have not received it). In this e-mail you will find the download link for the software. Possibly this link is being blocked by your e-mail program, in that case follow these steps to download the software:
Go to shop.researchsoftware.com (or click ‘Shop’ at www.researchsoftware.com).
Click ‘Login’ (header, right top). You will be redirected to our identity provider id.esdnow.com.
When you have logged in, you will be sent back to the ‘My Account’ shop environment (click on ‘My Account’ if you are on another page in the shop).
Now you get to see the details of your account, orders and downloads (My orders, My wishlist and Downloads & licenses).
Click the order number of your order to see the order details.
Click ‘Downloads & licenses’ to see your license info and download link.
How long does it take to get the Refund?
Please allow us 3-5 business days for your refund to process. Refund amount will be automatically debited to the same form of payment (method) originally used for purchase.
Orders
How do I cancel or change my order?
Unfortunately, because of the nature of the deliverables (immediate relase of licenses and downloads) it’s not possible to make any changes to an order or cancel it once it has been placed. However, you could ask for a refund.
How to track my order?
You will receive an email from us after you have placed the order. We willl let you know when your order payment has been processed and send you an email with the license details and download information.
What are my payment options?
We accept all the popular payment methods such as Wero (European iDeal), Bancontact, Visa, MasterCard, American Express, Maestro, Paypal.
Refund & Exchange
How long does it take to get the Refund?
Please allow us 3-5 business days for your refund to process. Refund amount will be automatically debited to the same form of payment (method) originally used for purchase.
How do I track my Refund?
To track the status of your refund, kindly refer to your confirmation email that you have received from us. The complete refund process may take 5 to 7 business days.
What is your Refund & Exchange Policy?
Because of the nature of the deliverables (immediate relase of licenses and downloads) we do not refund especially when the product (license) has been activated. If you would like to order a different product (license) type you may request an exchange. You can ask for a replacement and refund within 30 days of your purchase.
Delivery & Download
Do you ship overseas?
Because of the nature of the deliverables (immediate relase of licenses and downloads), yes, we can deliver the license and download all over the world. Please note that additional VAT (tax) costs will be applied based on EU country you get the downloadable goods delivered.
Do you offer free shipping?
Because of the nature of the deliverables (immediate relase of licenses and downloads), there are no shipping charges.
How long does the delivery take?
Because of the nature of the deliverables (immediate relase of licenses and downloads), the license details and download link(s) are dispatched by email within a few minutes. With Students editions we might ask you to send us a photo or scan of your student card as a proof.
Eligibility: A full-time or part-time student (no PhD students) currently enrolled at an accredited education institution. We require you to send us a photo or scan of your valid student card as a proof. After we received the photo or scan we will send you the download link and serial number. Same EndNote, same features, same powerful package.